How to connect to MySQL database Server from PySpark and read the table into DataFrame and write the DataFrame to the table?
Steps to connect PySpark to MySQL Server and Read and write Table.
- Step 1 – Identify the PySpark MySQL Connector version to use
- Step 2 – Add the dependency
- Step 3 – Create SparkSession & Dataframe
- Step 4 – Save PySpark DataFrame to MySQL Database Table
- Step 5 – Read MySQL Table to PySpark Dataframe
In order to connect to MySQL server from PySpark, you would need the following. Make sure you have these details before you read or write to the MySQL server.
- MySQL server address & port
- Database name
- Table name
- User name and
- Password
1. MySQL Connector for PySpark
To read a table using jdbc() method, you would minimum need a driver, server ip, port, database name, table, user, and port. JDBC is a Java standard to connect to any database as long as you provide the right JDBC connector jar in the classpath and provide a JDBC driver using the JDBC API. PySpark also leverages the same JDBC standard when using jdbc() method.
The connector I am using in this article is mysql-connector-java.jar and the driver I am using com.mysql.jdbc.Driver.
MySQL provides connectors for each server version hence, please choose the right version based pm server version you use. Download the mysql-connector-java-8.0.13.jar and keep it in your current directory.
2. Create SparkSession & DataFrame
Creating a SparkSession is a basic step to work with PySpark hence, first, let’s create a SparkSession and construct a sample DataFrame with columns id, name, age and gender. In the below sections, I will use this DataFrame to write into a MySQL table and read from it.
# Imports
from pyspark.sql import SparkSession

# Create SparkSession
spark = SparkSession.builder \
           .appName('SparkByExamples.com') \
           .config("spark.jars", "mysql-connector-java-8.0.13.jar")
           .getOrCreate()

# Create DataFrame
columns = ["id", "name","age","gender"]
data = [(1, "James",30,"M"), (2, "Ann",40,"F"),
    (3, "Jeff",41,"M"),(4, "Jennifer",20,"F")]

sampleDF = spark.sparkContext.parallelize(data).toDF(columns)
3. Write PySpark DataFrame to MySQL Database Table
You would be required to provide the MySQL server & database details while writing PySpark DataFrame to the table. Use the format() to specify the driver, this driver class is defined in the MySQL connector dependency.
Some points to note while writing
- The
mode("overwrite")drops the table if already exists by default and re-creates a new one without indexes. - Use
option("truncate","true")to retain the index. - This connector by default uses
READ_COMMITTEDisolation level. You can change this usingoption("mssqlIsolationLevel", "READ_UNCOMMITTED").
# Write to MySQL Table
sampleDF.write \
  .format("jdbc") \
  .option("driver","com.mysql.cj.jdbc.Driver") \
  .option("url", "jdbc:mysql://localhost:3306/emp") \
  .option("dbtable", "employee") \
  .option("user", "root") \
  .option("password", "root") \
  .save()
Here, used mode("overwrite") means if the table already exists with rows, overwrite the table with the rows from the DataFrame. The overwrite mode first drops the table if it already exists in the database.
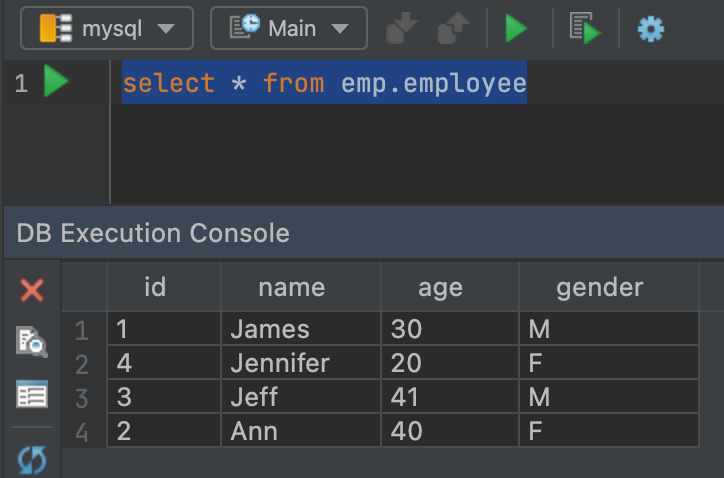
4. Read MySQL Database Table to PySpark DataFrame
Similar to writing, with read() also you need to provide the driver and the MySQL connection details. In the below example, I am reading a table employee from the database emp to the DataFrame.
# Read from MySQL Table
val df = spark.read \
    .format("jdbc") \
    .option("driver","com.mysql.cj.jdbc.Driver") \
    .option("url", "jdbc:mysql://localhost:3306/emp") \
    .option("dbtable", "employee") \
    .option("user", "root") \
    .option("password", "root") \
    .load()
Yields below output. Alternatively, you can also use spark.read.jdbc() in PySpark
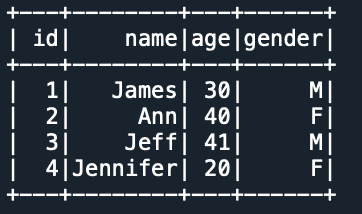
5. Select Specific Columns to Read
In the above example, it reads the entire table into PySpark DataFrame. Sometimes you may not be required to select the entire table, so to select the specific columns, specify the query you wanted to select with dbtable option.
# Read from SQL Table
df = spark.read \
  .format("jdbc") \
  .option("driver","com.mysql.cj.jdbc.Driver") \
  .option("url", "jdbc:mysql://localhost:3306/emp") \
  .option("dbtable", "select id,age from employee where gender='M'") \
  .option("user", "root") \
  .option("password", "root") \
  .load()

df.show()
Alternatively, you can also use the query option. Note that you can use either dbtable or query option but not both at a time. Also, when using the query option, you can’t use partitionColumn option.
#Using query
df = spark.read \
  .format("jdbc") \
  ......
  ......
  .option("query", "select id,age from employee where gender='M'") \
  .......
  .......
  .load()
6. Read MySQL Table in Parallel
Use option numPartitions to read MySQL table in parallel. This property also determines the maximum number of concurrent JDBC connections to use. The below example creates the DataFrame with 5 partitions. I have also used the fetchsize option which is used to specify how many rows to fetch at a time, by default it is set to 10.
# Using numPartitions
df = spark.read \
  .format("jdbc") \
  .option("query", "select id,age from employee where gender='M'") \
  .option("numPartitions",5) \
  .option("fetchsize", 20) \
  .......
  .......
  .load()
7. Append Table
Use spark.write.mode("append") to append the rows to the existing MySQL database table.
# Write to SQL Table
sampleDF.write \
  .format("jdbc") \
  .option("driver","com.mysql.cj.jdbc.Driver") \
  .option("url", "jdbc:mysql://localhost:3306/emp") \
  .option("dbtable", "employee") \
  .option("user", "root") \
  .option("password", "root") \
  .save()
8. PySpark Shell MySQL Connector
Sometimes you may be required to connect to MySQL from the PySpark shell interactive mode to test some queries, you can achieve this by providing MySQL connector library to spark-shell. once the shell started, you can run your queries.
bin/pyspark
      --master local[*]
      --jars /path/to/mysql/connector/mysql-connector-java-8.0.13.jar
9. Spark Submit MySQL Connector
Similarly, you also need to add the MySQL connector jar to the –jar with spark-submit. If you have multiple jars refer to how to add multiple jars to spark-submit. With this command
bin/spark-submit
      --master yarn
      --jars /path/to/mysql/connector/mysql-connector-java-8.0.13.jar
      .........
      .........
      .........
9. Complete Example
Following is the complete example of how to connect to MySQL server from PySpark and read/write the table.
# Imports
from pyspark.sql import SparkSession

# Create SparkSession
spark = SparkSession.builder
           .appName('SparkByExamples.com')
           .config("spark.jars", "mysql-connector-java-8.0.13.jar")
           .getOrCreate()

# Create DataFrame
columns = ["id", "name","age","gender"]
data = [(1, "James",30,"M"), (2, "Ann",40,"F"),
    (3, "Jeff",41,"M"),(4, "Jennifer",20,"F")]

sampleDF = spark.sparkContext.parallelize(data).toDF(columns)

# Write to MySQL Table
sampleDF.write \
  .format("jdbc") \
  .option("driver","com.mysql.jdbc.Driver") \
  .option("url", "jdbc:mysql://localhost:3306/database_name") \
  .option("dbtable", "employee") \
  .option("user", "root") \
  .option("password", "root") \
  .save()

# Read from MySQL Table
val df = spark.read \
    .format("jdbc") \
    .option("driver","com.mysql.jdbc.Driver") \
    .option("url", "jdbc:mysql://localhost:3306/database_name") \
    .option("dbtable", "employee") \
    .option("user", "root") \
    .option("password", "root") \
    .load()

df.show()
Conclusion
In this article, you have learned how to connect to a MySQL server from PySpark and write the DataFrame to a table and read the table into DataFrame with examples.
Related Articles
- PySpark Read and Write SQL Server Table
- PySpark Read JDBC Table to DataFrame
- PySpark Read JSON file into DataFrame
- PySpark Query Database Table using JDBC
- PySpark Read and Write Parquet File
- PySpark Read CSV file into DataFrame
- PySpark Read Multiple Lines (multiline) JSON File
- PySpark createOrReplaceTempView() Explained
- Dynamic way of doing ETL through Pyspark
- PySpark cache() Explained.